Select a section to access example attribute file downloads, attribute formatting guides for each assay, or more information regarding attribute roles in experiments.
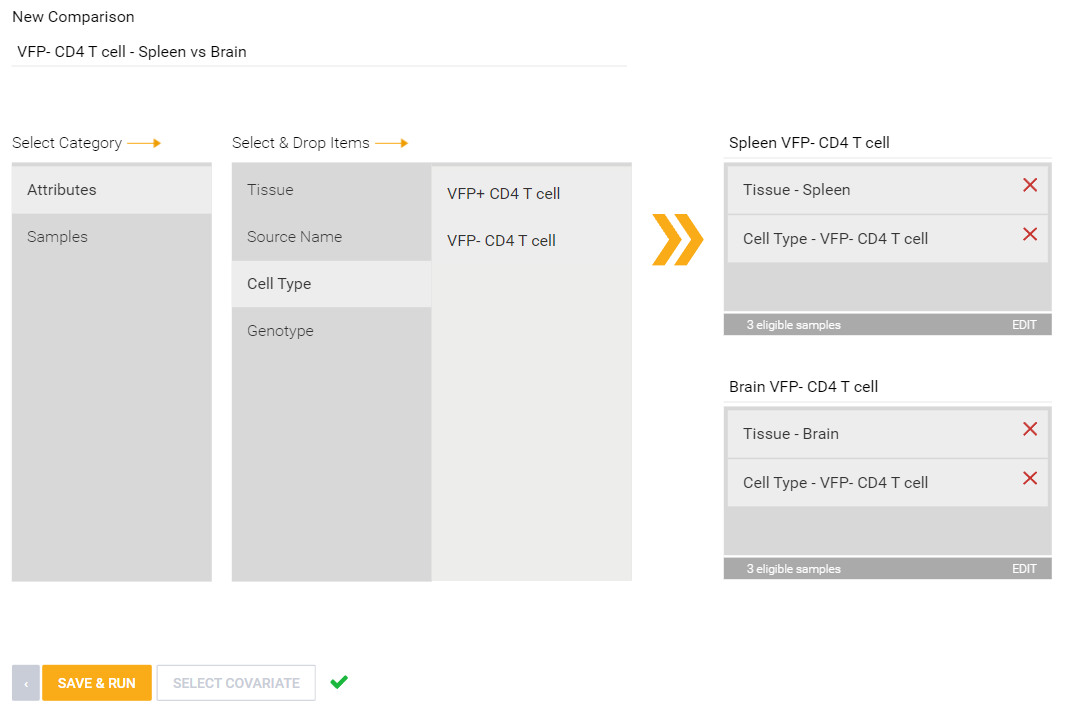
Defined attributes allow for creation of comparisons. Attributes will appear as a category that you can drag and drop into "Condition" and "Control" boxes to create a comparison. With multiple attributes defined, multiple tiers of groups can be further defined, such as the below example: Spleen vs Brain tissue but only VFP- CD4 T cell types in each tissue. Multiple attributes could also allow for covariate correction if conditions are met. To learn more about covariate correction, see this article.
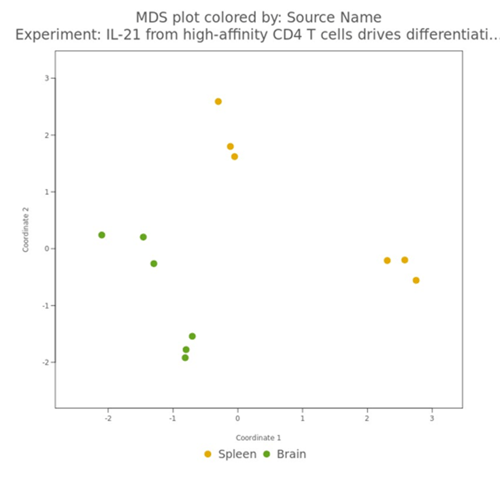
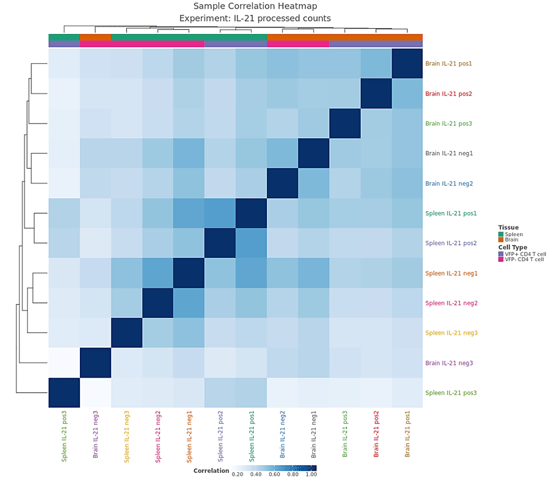
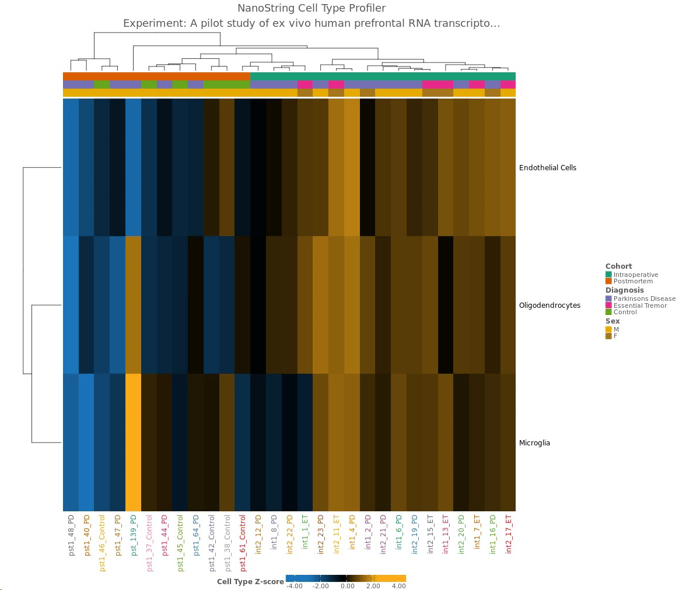
Defined attributes will appear on the Experiment Summary and QC page after your experiment has launched and processed. Multiple QC visualizations, including the MDS plot, Sample Correlation heatmap, NanoString Cell Type Profiler (if applicable) will annotate attribute information to help identify potential outliers and visualize your data according to your different attributes.
nCounter Gene Expression or miRNA
nCounter TCR Diversity example 1
nCounter TCR Diversity example 2 (with Time Course Assay)
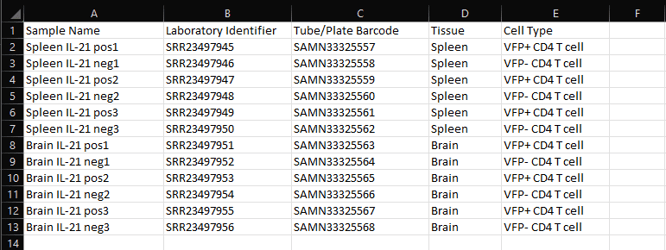
A) Sample Name: Enter a unique sample name for each of your experiment samples.
B) Laboratory Identifier: Optional field for internal tracking within ROSALIND. This column may not be automatically generated with CSV creation, but can be manually added as Column B.
C) Tube/Plate Barcode: Similar to Laboratory Identifier, an additional optional field for internal tracking within ROSALIND. This column may not be automatically generated with CSV creation, but can be manually added as Column C.
Additional Columns: Study attributes that were added during experiment set up prior to attribute CSV file generation. Enter attribute values corresponding to each sample. Optionally, new attributes can be added into new, following columns if needed.

A) Sample Name: Enter a unique sample name for each of your experiment samples.
B) Laboratory Identifier: Optional field for internal tracking within ROSALIND. This column may not be automatically generated with CSV creation, but can be manually added as Column B.
C) Input Control: Indicate Yes/No for each sample depending on if that sample was a ChIP-seq input control sample.
D) Antibody: This column will show an internally associated number for each antibody specified at an earlier step during experiment set up within ROSALIND.
Additional Columns: Study attributes that were added during experiment set up prior to attribute CSV file generation. Enter attribute values corresponding to each sample. Optionally, new attributes can be added into new, following columns if needed.
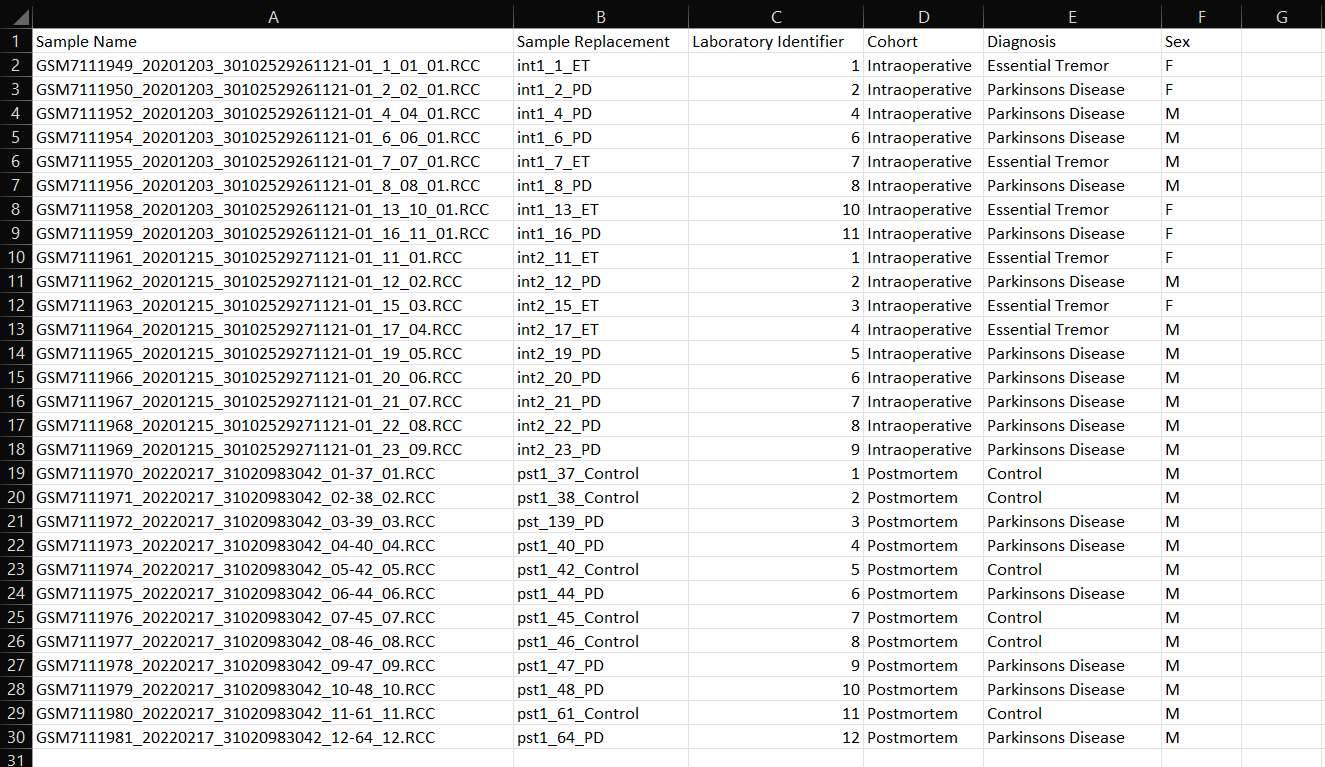
A) Sample Name: This column contains the exact RCC file names. Do not edit this column as ROSALIND uses this column to locate the RCC files and associate them with the appropriate samples.
B) Sample Replacement: Use this column to enter a unique sample name for each of your experiment samples that will be used as replacement names from RCC files in QC and results representations.
C) Laboratory Identifier: Optional field for internal tracking within ROSALIND. This column may not be automatically generated with CSV creation, but can be manually added as Column C.
Additional Columns: Study attributes that were added during experiment set up prior to attribute CSV file generation. Enter attribute values corresponding to each sample. Optionally, new attributes can be added into new, following columns if needed.

A) Sample Name: This column contains the exact RCC file names. Do not edit this column as ROSALIND uses this column to locate the RCC files and associate them with the appropriate samples.
B) Sample Replacement: Use this column to enter a unique sample name for each of your experiment samples that will be used as replacement names from RCC files in QC and results representations.
C) Laboratory Identifier: Optional field for internal tracking within ROSALIND. This column may not be automatically generated with CSV creation, but can be manually added as Column C.
D) Panel Standard: Indicate 1 (yes) or 0 (no) for each sample depending on if that sample was a TCR panel standard sample.
Additional Columns: Study attributes that were added during experiment set up prior to attribute CSV file generation. Enter attribute values corresponding to each sample. Optionally, new attributes can be added into new, following columns if needed.
*All sample attributes should be non-numerical values unless requesting a time-course assay. If a time-course assay is required, see the below example:

If your experiment requires a time-course assay- follow the directions in example 1 for standard attributes, then use the below directions to enter time related attributes.
Required Column Headers:
TimeSeries: A numerical value to order the data; for example if data contains Day0, Day15, and Day30, TimeSeries would follow the order of 1 (Day0), 2 (Day15), and 3 (Day30). See example 2 table above.
TimeSeriesLabel: Characters (or string) that will label the graphs (e.g. 12h, 1d, 24h or Day0, Day15, Day30, etc). See example 2 table above.
Bulk RNA-Sequencing: "IL-21 from high-affinity CD4 T cells drives differentiation of brain-resident CD8 T cells during persistent viral infection_bulkRNAseq_"
ATAC-Sequencing: "Evaluating the mouse neural precursor line- SN4741- as a suitable proxy for midbrain dopaminergic neurons -ATAC-seq"
ChIP-Sequencing: "Mouse alveolar organoids treated with bleomycin_ChIPseq"
nCounter Gene Expression: "A pilot study of ex vivo human prefrontal RNA transcriptomics in Parkinson’s disease"
nCounter TCR Diversity: "Cord and Peripheral Blood-Derived Transgenic T cells - TCR Report -NanoString Human CART Panel"
Single Cell Sequencing: Navigate to "Showcases" and select "Single Cell RNA-seq on ROSALIND"
Select a file type section for file formatting guides, examples, and associated directions.
For NanoString gene expression panels, follow the file recommendations below:
For any projects involving deviations from these recommendations, please contact your local NanoString representative to explore best strategies for analysis.
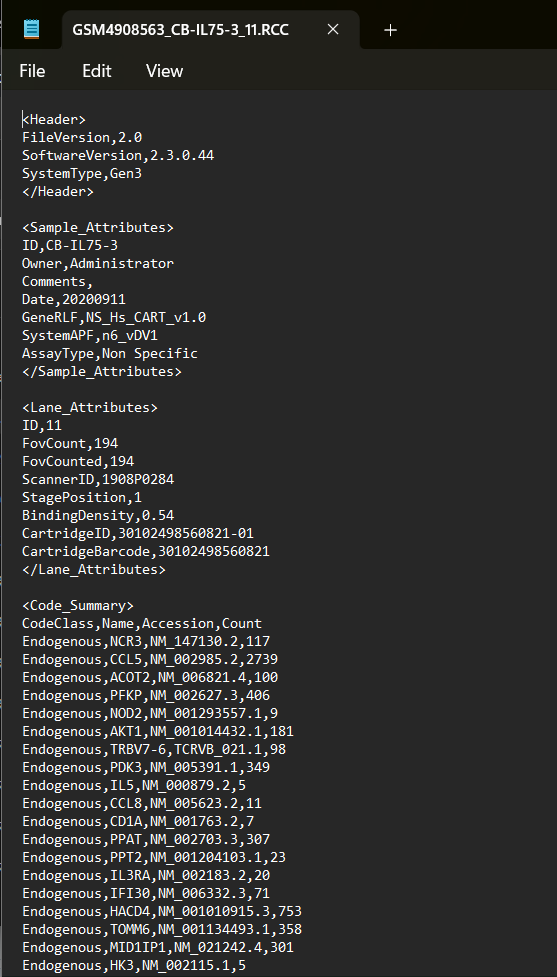
Example RCC File in Text Editor:
If information above is unknown, RCCs can be opened in a text editor or by contacting NanoString support to identify:
Ensure each sample RCC uploaded to the same experiment match both GeneRLF and SystemType.
Jump to:
Exporting Normalized Counts from nSolver
Example Normalized Counts File
For NanoString gene expression panels from Normalized Counts, follow the guidelines below:
For any projects involving deviations from these recommendations, please contact your local NanoString representative to explore best strategies for analysis.
Exporting Normalized Counts from nSolver:
Step 1: After normalizing your data in nSolver, select Normalized Data for your chosen experiment.
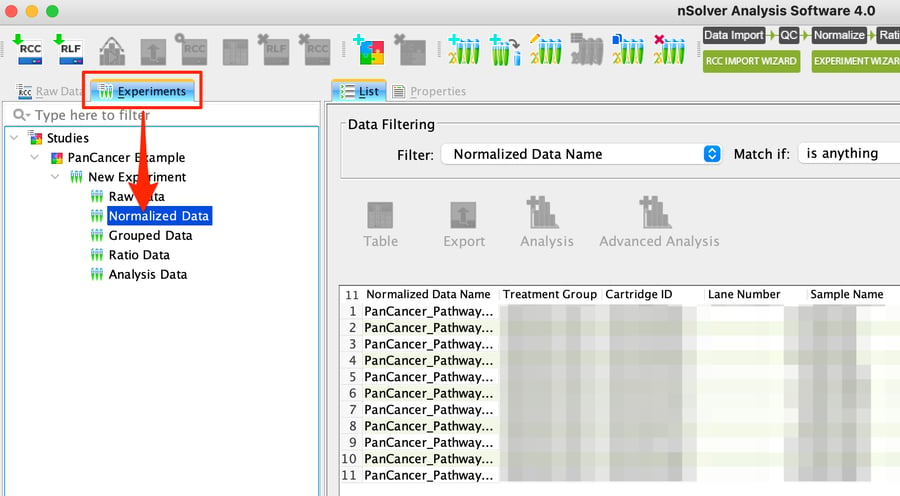
Step 2: Highlight all the data using the number in the top left corner of the table, and then click on the Export button.
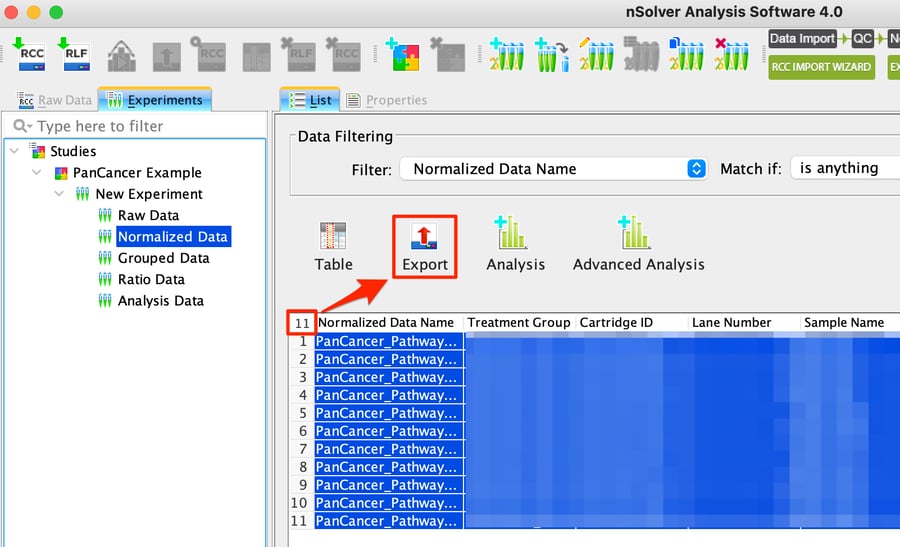
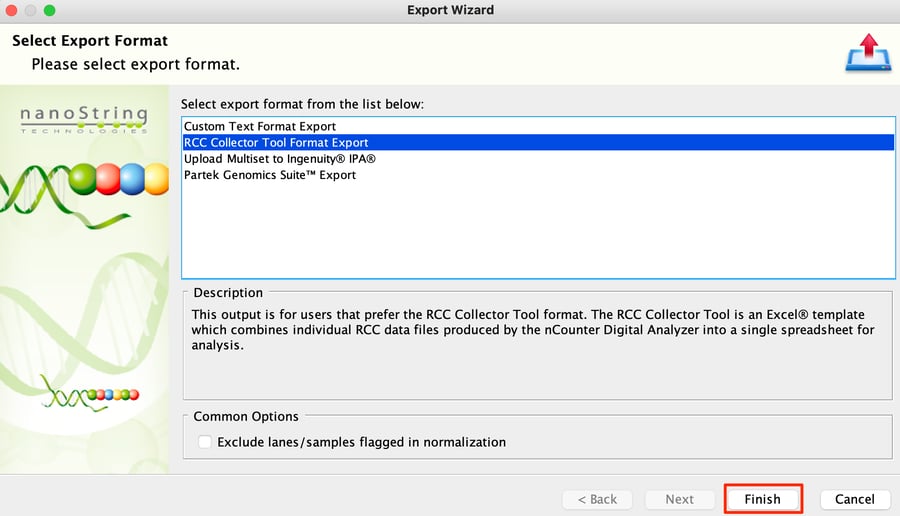
Step 3: Choose RCC Collector Tool Format Export option and then choose Finish to save the CSV file.
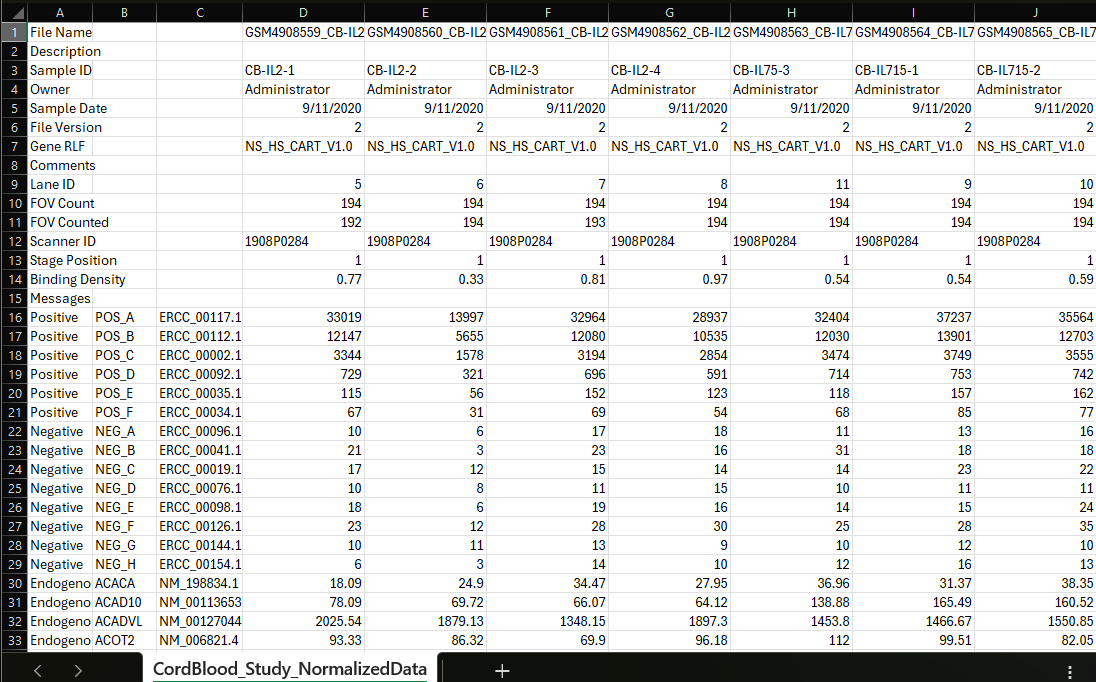
Example Normalized Counts file in RCC Export Format:
Download example Normalized Counts file here
RCC export format maintains key project information in the top 15 rows such as:
At this time, ROSALIND is not able to import additional PanelPlus annotations that were added onto an existing NanoString Panel.
If you receive a warning like the one below, see directions for Custom Annotations:

However, the annotations for the standard NanoString Panel that has already been imported into ROSALIND will likely have the majority of your annotations available.
You can still analyze your PanelPlus gene set in ROSALIND because you will see normalized expression values and differential expression results for your PanelPlus customized genes.
Please note that Gene Set Analysis scores or Cell Type Profiler enrichment will not reflect any differences compared to the standard panel. In other words, since annotations are required in order to calculate the Gene Set Analysis scores and Cell Type Profiler enrichment, only the standard panel genes are included for those specific components of the analysis.
An alternative approach that you may find helpful would be to create a custom gene list within ROSALIND. For more information on how to do this, please see How to Create a Custom Gene List.
Jump to:
Annotation File Request from NanoString
If you receive a warning like this, follow the steps below for importing, requesting, and creating Custom Probe Annotations:

Importing Custom Annotations Workflow:
*Note: Custom annotation import is a service for upgraded subscriptions and is not included with the nCounter Starter. Our subscription options can be reviewed here or by contacting sales@rosalind.bio.
Step 1: REQUEST or CREATE a Custom Probe Annotation file.
Step 2: Email ROSALIND Support with the following information:
Step 3: Our Support Team will then check the compatibility. Once you receive confirmation from our Support Team that these have been successfully uploaded, please proceed with uploading your data and you will notice the warning "Custom Annotation Missing" has cleared.
Please contact support@rosalind.bio if you have questions or need assistance.
Annotation File Request from NanoString:
To REQUEST a probe annotation file from NanoString, follow the instructions from the chapter "Creating an Advanced Analysis: Requesting Probe Annotations from NanoString" in Advanced Analysis 2.0 User Manual:
Annotation File Creation by User:
To CREATE a probe annotation file, follow the instructions from the chapter "Creating an Advanced Analysis: Managing Probe Annotations" in Advanced Analysis 2.0 User Manual:
Download example Custom Probe Annotation File here

*Written By Praveer Sharma (Previous Bay Area FAS, NanoString)
MultiRLF Merge data can be imported into Rosalind by exporting the normalized merged data from nSolver. This exported data has a couple of features not present in standard (i.e. non merged) data. First, it is missing the synthetic ERCC controls entirely. Rosalind will not successfully import data without the synthetic controls, so these need to be incorporated into the file that will be imported. Second, as different codesets are developed over time, the exact probe sequences used are changed and refined. So different RLFs can have different probes for the same target, and these duplicates will be present in the normalized file exported from nSolver. Rosalind will not successfully import data where housekeepers are duplicated; it will import duplicated endogenous genes, but will not perform statistics on them properly (this is due to the way Rosalind reads the import file). So the three concerns that need to be addressed are: 1) missing synthetic controls, 2) duplicated housekeepers, 3) duplicated endogenous genes.
Alternatively, one copy can be deleted. However, this must be done carefully and with biological justification.
Once these changes have been made, the saved .csv file can be imported into Rosalind (as a normalized file), and it should process correctly.
Q) Should we include the panel standard sample in the analysis?
A) It depends on the purpose of the panel standard. Are you using it to calibrate data across more than one manufacturing lot of probes?
If so, that feature is not yet available in Rosalind and will need to be performed in nSolver. After this step, the normalized data can be exported from nSolver and uploaded to Rosalind. Currently, panel standards are not used by Rosalind with the exception of the nCounter TCR Diversity data.
Select a file type section for file formatting guides, examples, and upload directions.
Single-End data have a single file corresponding to each sample.
File Name Example:
Sample1_001.fastq.gz
Sample2_001.fastq.gz
Sample3_001.fastq.gz
File Upload:
Select single-end from the toggle on the upload screen, and upload your sample file in the box corresponding to each sample by selecting the box or dragging and dropping the file to the box:
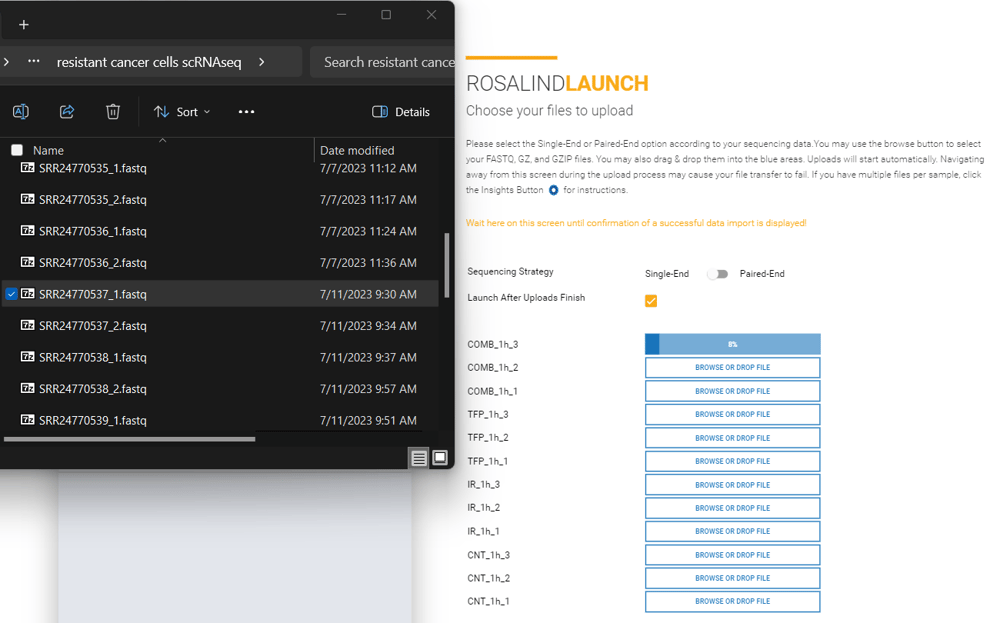
Paired-End data typically have R1 and R2 in the file name, which stand for Read 1 and Read 2, or are sometimes referred to as Left Read and Right Read. Two files correspond to one sample.
File Name Example:
Sample1_L001_R1_001.fastq.gz
Sample1_L001_R2_001.fastq.gz
Sample2_L001_R1_001.fastq.gz
Sample2_L001_R2_001.fastq.gz
Sample3_L001_R1_001.fastq.gz
Sample3_L001_R2_001.fastq.gz
File Upload:
Select paired-end from the toggle on the upload screen, and upload your R1 file to the Left Read (R1) box, and your R2 file to the Right Read (R2) box by selecting the box or dragging and dropping the file to the box:
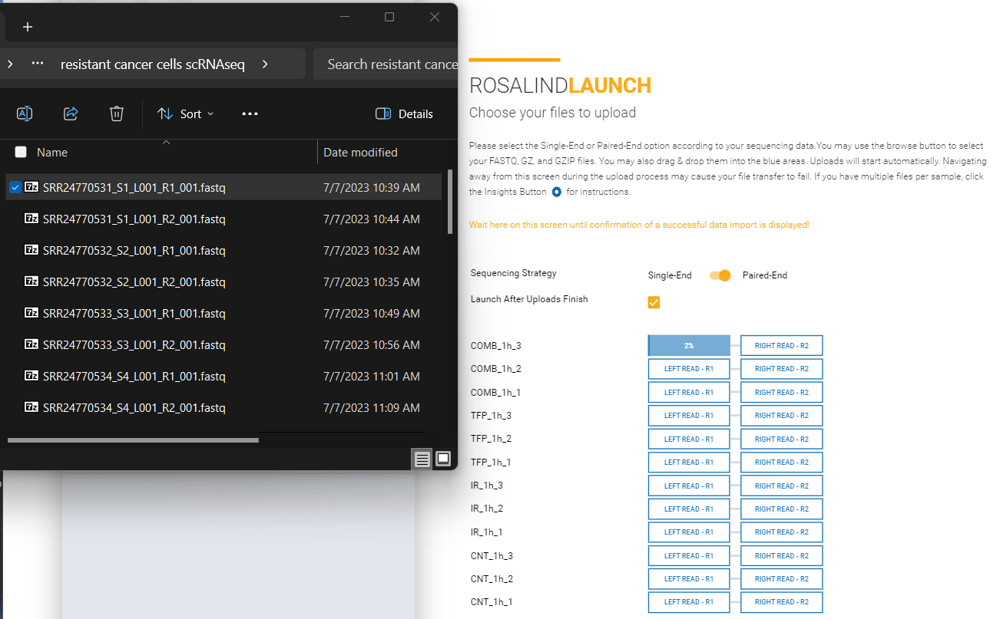
Multi-Lane data typically contain a description similar to L001 or L002 in the file name. Multi-lane data could have anywhere from 2 to 8 FASTQ files per sample.
File Name Example:
Sample1_L001_001.fastq.gz
Sample1_L002_001.fastq.gz
Sample2_L001_001.fastq.gz
Sample2_L002_001.fastq.gz
Sample3_L001_001.fastq.gz
Sample3_L002_001.fastq.gz
File Upload:
Multi-lane data can be added by selecting all files that correspond to a sample, and dragging and dropping them together into the appropriate upload box. Or, by clicking on an upload box and selecting all the files that correspond to each sample.
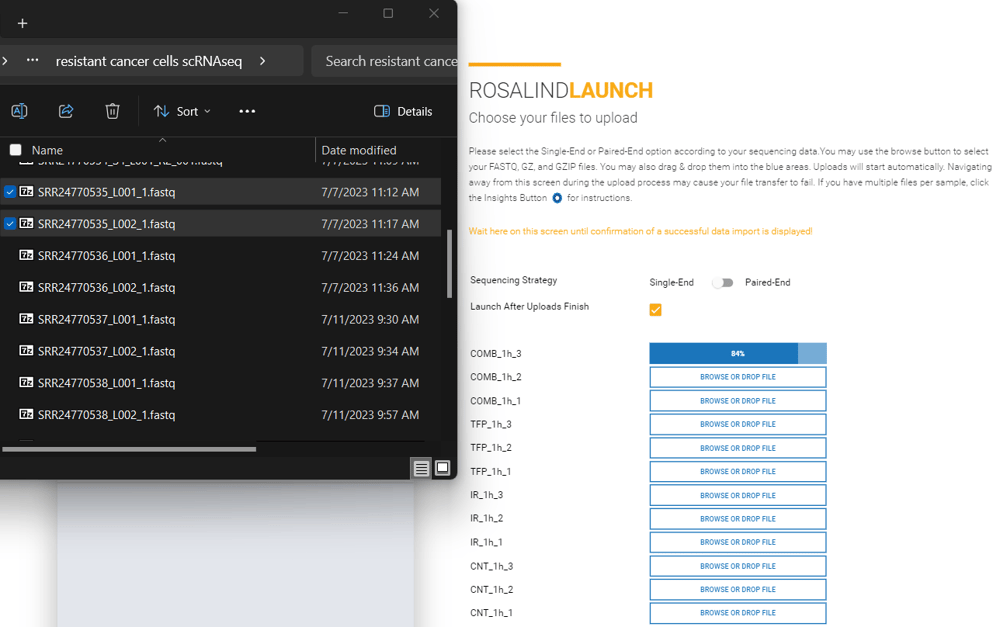
Paired-End Multi-Lane data typically contain a description similar to L001 or L002 in the file name in addition to R1 and R2. Multi-lane data could have anywhere from 2 to 8 FASTQ files per sample.
File Name Example:
Sample1_L001_R1_001.fastq.gz
Sample1_L001_R2_001.fastq.gz
Sample1_L002_R1_001.fastq.gz
Sample1_L002_R2_001.fastq.gz
Sample2_L001_R1_001.fastq.gz
Sample2_L001_R2_001.fastq.gz
Sample2_L002_R1_001.fastq.gz
Sample2_L002_R2_001.fastq.gz
Sample3_L001_R1_001.fastq.gz
Sample3_L001_R2_001.fastq.gz
Sample3_L002_R1_001.fastq.gz
Sample3_L002_R2_001.fastq.gz
File Upload:
Select paired-end from the toggle on the upload screen. Upload R1 files to the Left Read (R1) box and R2 files to the Right Read (R2) box by selecting all files that correspond to a sample, and dragging and dropping them together into the appropriate upload box. Or, by clicking on an upload box and selecting all the files that correspond to each sample.
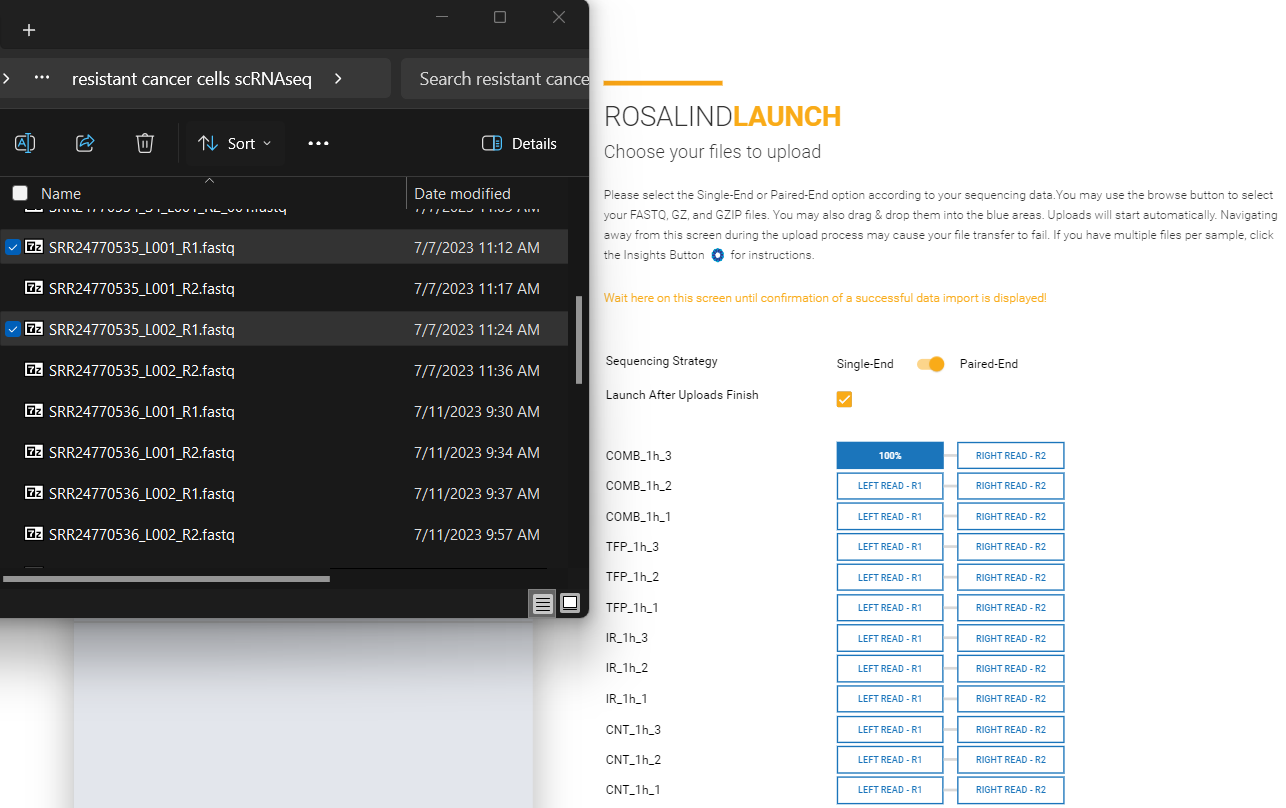
Q) Do I need to upload my index files?
A) No, index files do not need to be uploaded. Uploading an index file can interfere with data processing.
Q) What file formats are accepted when uploading paired or multi-lane data?
A) Accepted file types are FASTQ, FASTQ.gz, and GZIP files.
Q) Will the file upload still work if I have different numbers of lanes?
A) Yes, different numbers of lanes work fine.
Q) Should I rename my files before uploading them?
A) You don’t need to rename your files since your file names already contain information about lanes and/or paired-ends. Changing these names may make it difficult to locate your files.
Select a Quick Start Guide below to access the PDF Download:
A 2-page guide of training and support resources for ROSALIND
An introduction to the ROSALIND platform and its capabilities.
An introduction to NanoString nCounter data analysis in ROSALIND.