How to Manage Gene Lists and Signatures

Accessing Gene Lists and Signatures
From the ROSALIND home page, you can access the user profile (and all other user features) by clicking the User option in the vertical navigation menu on the left side of the screen. You can also access this page through the User Menu.
From the user profile page, you can view the gene lists and signatures page by clicking on the Gene Lists & Signatures button in the user features menu at the top of the page. You can also access this page through the user menu.

Creating Gene Lists and Signatures
We've created a comprehensive tutorial video on how to Create and Use a Gene List in ROSALIND, you can watch it in the ROSALIND Academy Video Library Key Features Section or follow this guide.
You can find all the gene lists you’ve created under the My Lists tab on the gene list manager page.

To add a new gene list, click the Add Gene List button at the bottom of the "My Lists" tab.
After clicking the Add Gene List button, you will be prompted to select a list type and add a list name and description. The options for list type are "Gene" and "miRNA". You can return to the gene list manager by clicking All Gene Lists at the top of the page.

Clicking Next after selecting a list type and adding a list name and description will open a new empty list with the Manage tab selected in the left sidebar. From here you can add genes, miRNA, or pathways individually, or upload a CSV file.
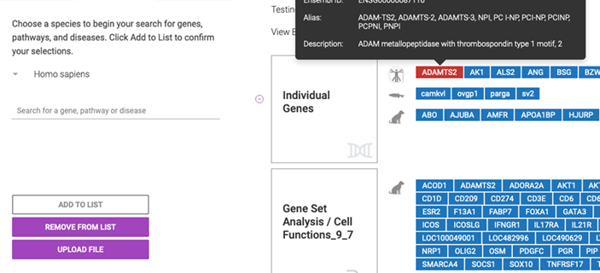
Use the text field on the left-hand side menu to search for genes, miRNA, pathways, or upload a CSV file. Select "Add to List" to add your selection to your gene list.


We offer a variety of different species that you can search by genes for. Our default is Homo Sapiens, but you can click on the drop-down menu to see the other species we support.
To remove a gene from your list, click on it—it will turn red. Then click the Remove From List button in the left sidebar. The gene will be removed from your list immediately.

Managing a Gene List
Gene list details can be edited from the gene list manager page. To open editing options, hover over the list you want to edit and click the edit icon that appears to the left of the list.

Uploading a Gene List File
To add genes from a file, click the Upload File button in the left sidebar. Then select or drop a file into the upload gene list page. The file should either contain gene symbols separated by commas or be a gene list that’s been downloaded from ROSALIND. Click Download Template in the top right corner to see an example of the proper format. To return to your gene list and exit the file upload process, click the name of your list at the top of the page.

After uploading a file, ROSALIND will populate the "File Name" and "Located Genes" fields. These cannot be edited. You must select at least one species for the file. Each time you select a species, a new, optional Select Species dropdown will appear. You can delete species selections by clicking the delete icon that appears on hover. To remove the file you uploaded, click the Reset button.
Clicking the Finish & Save button will add the genes from your file to the "Individual Genes" category in your gene list.

Sharing Gene Lists
You can find all the gene lists that have been shared with you under the Shared With Me tab on the gene list manager page.


In order to view, edit, and use a gene list that has been shared with you, you have to copy it over to your account. To copy a list, click the copy icon on the right side of the shared gene list entry.
To un-share a list with a user, hover over their profile in the shared user list and click the delete icon that appears. They will be removed immediately.
Saving Filtered Genes to a List
You can create a gene list of all genes of interest within an experiment. Select all genes of interest by holding the Ctrl or Command key. Once all genes are selected, a 'list' tab will appear in the bottom tab. From here, select "+ New List" to save the list.

Importing your Gene List into Experiments
Once your gene list is ready, you can easily import your gene list into any of your comparisons.
Simply access your comparison, then select the pin icon on the left-hand side of your screen. Select your gene list from the drop-down menu of available gene lists.

Once loaded, you should see all genes that are differentially expressed between your comparison group and are also included on your gene list. ROSALIND will report back to you how many genes from your gene list were not differentially expressed in your comparison.
To learn more about managing User Account, Projects, and Spaces, see their respective Articles.
/Rosalind_Logo_Primary_RGB.png?width=100&height=75&name=Rosalind_Logo_Primary_RGB.png)